
Page 16 - Embou-Sure Book Series
P. 16
Saxophone Embou-Sure
by Randall Spicer
There are as many or more students that play the saxophone than play any of the other woodwind instruments. The success of jazz festivals, the promi- nence and leadership of fine soloists and the added strength to the marching band have made the saxophone attractive to many students. The teacher/di- rector’s responsibility is to provide good guidance.
ments should be well adjusted and ready to play.
MOUTHPIECE AND LIGATURE
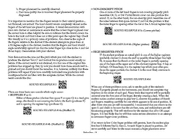
Directors know that there are many kinds of mouthpieces for all instruments. Saxophonists will use one style for their band and solo work. They will use another more powerful mouthpiece for their jazz work. A mouthpiece may be roughly placed in one of three styles.
Look at the back bores. “A” (the circle) will give the most pleasant sound for serious playing. “B” is a compromise that will give a good tone with more bril- liance. “C” will give the most power to the tone. Of course, there are many, many variations and ideas used with the clarinet and saxophone mouthpieces. Some players spend a lifetime looking for the best mouthpiece and reed.
The ligature must be loosened to allow the back end of the reed to be slipped under the ligature on the mouthpiece. The reed is then lined up to form a good match with the tip rail and the side rails. Tighten the ligature enough to hold reed in place. Vibrations will be stifled and bruise marks may bend the reed if screws are too tight. The teacher should fit the reed to the student’s mouthpiece.
Use a brand of reed that is consistently good. A good dealer and advanced students can give advice about reeds. Altitude and humidity are factors to
be considered in reed selection. A soft reed can be used in dry climates like Colorado. A stiffer reed must be used in the dampness of coastal areas. Look at the heel or butt-end of the reed.
Look at the face of the reed. Roll tip of reed on your thumbnail. 1/8 inch is flexible and even. A few fibers will go to tip of reed and face cut is even. There will be a balance of light shading between the tip, sides, vamp and
1. Assembly
2. Mouthpiece and ligature 3. Choice of reeds
4. Posture
5. Breath support 6. The embouchure 7. Good tone
8. Techniques
Remove the instrument from its case and hook it to the neck strap. A neck strap of webbing (about 3/4 inch) is best. It can be adjusted quickly and it will remain firm and strong. Insert the neckpiece and add the mouthpiece. Be sure the metal joint of the neckpiece and the receiving joint of the instrument are clean. Cork grease is used only on the cork. Tighten the neck screw only enough to keep the neck- piece lined up with the saxophone body. A contin- ual forcing of this screw will “strip” threads. The neckpiece will swing freely from side-to-side and always bother the student. The mouthpiece must fit smoothly to the cork.
Any gap or play at point A will cause a leak in the tone (especially low notes). Yet, the mouthpiece must easily slip down the cork until intonation is OK. Use thin strips of paper to fill in any gap at point A.
Check the octave keys. Any leakage (poor adjustment) at these points will negate low notes and upper notes of the left hand. Quick repairs can be made by adding coats of Scotch Tape. Also check the G# key. This key may stick when the wet pad dries on the pad socket. Just press the G sharp key and “flick” the pad open. The free action of this key allows the pad to stick. This key sticks quite often, but there is nothing wrong with the instrument! These comments on assembly apply mainly to older instruments. Most newer instru-
Embou-Sure – 19
